Change Management Business Process

They always say,

“…a picture paints a thousand words…”

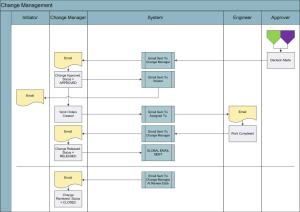
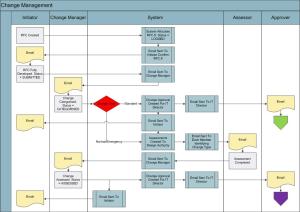
and, whilst generally not considered works of art, I find swim lane diagrams or cross-functional flowcharts (as they are called in Microsoft Visio) are a really superb way of explaining who does what when.

So, in the spirit of the above, whilst bored this evening (sat in a hotel room on my M2576 Implementing and Administering Microsoft Internet Information Services (IIS) 6.0 training course), I thought I would put together an example business process diagram for Change Management:

Change Management - Creation, categorisation and assessment

Change Management - Creation, categorisation and assessment

Change Management - Approval, release and closure

Change Management - Approval, release, and closure

I have saved it as both a Microsoft Visio 2003/2007 and Microsoft Visio 2002 diagram such that it might be useful to you as a starting point for your own Change Management process diagrams:

Microsoft Visio 2003/2007 Download
Microsoft Visio 2002 Download

As always, comments/feedback (positive or negative) is always welcome.

Automatically closing resolved calls after x days

Ok, so let’s say that you’ve implemented ITIL in your organisation and one of the requirements is that incidents are RESOLVED by the Service Desk and then CLOSED by the client. This is easy enough to implement in Service Desk Express by just creating a new User-Defined Status of RESOLVED that is flagged to “Stop The Clock” as shown below. (Incidentally, you need to create a custom version of the User-Defined Status form to add the “Stop The Clock” tick box to it.)

New Resolved Status

New Resolved Status

The issue however, is that your clients are not closing their calls and consequently management want the RESOLVED calls to be CLOSED automatically after 2 days of inactivity. This is possible to do with business rules BUT it’s horrible because your job queue fills up with all the tickets that are awaiting closure and as such, identifying failed rules becomes a nightmare. So, an alternative solution.

If you are using Service Desk Express 9.1 or above then salvation is here with the introduction of the Integration Engine. In this post I am going to use the Integration Engine to build a package that will do what we’ve mentioned above:

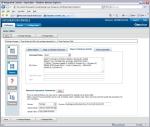
So we fire up the Integration Engine (http://appservername/integrationconsole by default) and add a new package called Close Resolved Calls. We then create a single step called the same thing as shown below:

Closing Resolved Calls 01

Closing Resolved Calls 01

When then customise the step as follows:

Initiator:

We use the Scheduler initiator as we want this function to run in the background without human intervention. In this example I have set it to run every hour starting at midnight.

Closing Resolved Calls 02

Closing Resolved Calls 02

Source:

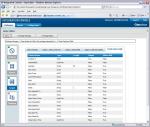
Now this is where it gets interesting as we need to specify a query that is going to get us all calls that are RESOLVED (I’ve added this as a User-Defined Status), which means they are open at the moment, that haven’t had any activity in the last two days. I am defining inactivity here as no Incident Details records created. The query to do this is as follows:

SELECT I.[Incident #] FROM [_SMDBA_].[Incident] I WHERE (SELECT Top 1 DATEDIFF(dd, ID.[Date], GETDATE()) FROM [_SMDBA_].[Incident Details] ID WHERE ID.[Incident #] = I.[Incident #] ORDER BY ID.[Date] DESC) > 2 AND I.[Status ID:] = 'RESOLVED' ORDER BY I.[Incident #]

As we want to run a specific query we need to use an ODBC source as opposed to SDE (or at least I find it easier than using the filter option).

Closing Resolved Calls 03Closing Resolved Calls 04Closing Resolved Calls 05Closing Resolved Calls 06

Target:

So now we have a source of all the incidents that are open, with a status of RESOLVED, and no incident details in the last 2 days. Now we specify the Target which in this case is the Incident table in Service Desk Express. Notice how the Insert/Update method is set to Update only, the business rules are being used, and we are updating on Incident #.
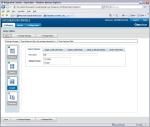
Closing Resolved Calls 07Closing Resolved Calls 08Closing Resolved Calls 09Closing Resolved Calls 10

Closing Resolved Calls 11

Closing Resolved Calls 11

Mapping:

So finally, all we need to do is map the [Incident #] together and hard-code the [Status ID:] = ‘CLOSED’.

Closing Resolved Calls 12

Closing Resolved Calls 12

And that’s it. Every hour it will pick up any calls that meet the criteria (incidents that are open, with a status of RESOLVED, and no incident details in the last 2 days) and it will close them. If you have a business rule that fires on update of an incident to a status of CLOSED then this will automatically fire as well. This is another huge plus of the Integration Engine.

You can download the final package here.

As always, keep the feedback coming (whether it be positive or negative). Hope it was useful.
Drop Down Lists In Cells In Excel

Frequently, I need to produce Excel Worksheets that have drop-down lists inside cells. If you ever need to do the same and can’t remember how – this is for you. The screenshots are taken from Excel 2007 but I have included references for Excel 2003 as well.

Personally, I always prefer to put the data that builds my drop-down lists on a separate worksheet. So create a new worksheet and rename it to Lists or something and open that worksheet. Now, lets say for argument you wanted three drop-down lists as follows:

Services: WAN; Email; Desktop; LAN; Applications

Categories: New User; Delete User; Change of Permissions; SAP; Exchange; Outlook

Severities: Low; Medium; High

On your Lists worksheet put these lists into three columns and give them headings as shown below:

Excel Lists 01

Lists Worksheet

Now select Insert > Name > Define (if you are using Excel 2003) or Formulas > Define Name (if you are using Excel 2007). The Define Name window will appear as shown below:

Excel Lists 02

Define Named Range

Select the cells that this range refers to (in this case =Lists!$A$2:$A$6) and click OK. Repeat the exercise creating a named range for Categories and Severities.

Now click back to you Main worksheet which for sake of arguement looks like the worksheet shown below:

Excel Lists 03

Main Worksheet

Select the cell you want the first drop-down list to appear in (in this case C2). Select Data > Data Validation (in Excel 2007) or Data > Validation (in Excel 2003) and the Data Validation window will appear as shown below:

Excel Lists 04

Data Validation of Cell

Select List from the Allow drop-down list and in the Source text box enter “=Services” as shown above. Repeat the exercise for the other cells on the Main worksheet (in my case D2 “=Categories” and F2 “=Severities”) and your good to go. All you now need to do is copy row 2 to the lower rows.

Hope this helps. As always, feedback is always welcome (both positive and negative).

TechMagic

Another project released. TechMagic is designed to provide engineers with a license free way of viewing incidents, work orders, purchase requests, problems and change requests assigned to themselves or a member of a group they belong to held in the BMC Service Desk Express database.

As with all my projects they are completely free. Any feedback would, as always, be greatly appreciated.

Automatically showing the FAQs in a given FAQ Category

By default when a user clicks on the FAQs in Self Service they are presented with a FAQ Category list and no FAQs. The user then needs to pick a category and use a search string (albeit it can be blank) to show the FAQs for that given category. I was curious to see if I could cause all the FAQs in a given category to show automatically when the drop down list of categories was changed. I could.

Open ShowFaqStaff.htm (located in c:Program FilesBMCService Desk ExpressSelf Service Deskhtml by default) in Notepad.

Replace:

<select class="BMCDropDownList" style="width:100%;" id="FAQCatNameList" AccessKey=<%=labelKey%> onChange="updateCat();resetFAQ();"  NAME="FAQCatNameList">

With:

<select class="BMCDropDownList" style="width:100%;" id="FAQCatNameList" AccessKey=<%=labelKey%> onChange="updateCat();showFAQ();" NAME="FAQCatNameList">

Then, assuming that you want the FAQs for the first FAQ Category to automatically show when the user first views the FAQs then you need modify a different file.

Open ShowFaqStaff.asp (located in c:Program FilesBMCService Desk ExpressSelf Service Desk by default) in Notepad.

Find the WindowOnLoad function and add the following line of code to the end of it:

showFAQ();

so that it looks like:

function WindowOnLoad()
{
...
selectedIndex = document.getElementById("FAQCatNameList").selectedIndex;
updateCat();
showFAQ();
}

Save the file and you should be good to go. I have only tested this with Service Desk Express 9.6 but it may work with previous versions as well. As always, comments (positive and negative) are always welcome.